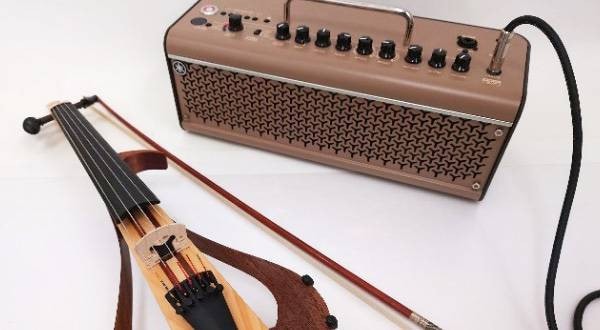
Amplification Setup for Electric Violins: Amps, Effects, and Recording Equipment
Share
Are you ready to elevate the sound of your electric violin, whether it's a violin, viola, cello, or upright bass? Whether you’re playing live, in the studio, or experimenting at home, having the right amplification setup can make all the difference—from preserving your instrument’s tonal nuance to unlocking creative sonic possibilities. In this guide, we’ll walk through the essential gear and considerations for building a powerful rig: amplifiers, effects, and recording equipment. Plus, you'll discover great options like Metzler’s diverse lineup of electric instruments, including electric violins, electric violas, electric cellos, and electric upright basses—perfect for players of every instrument family.
1. Choosing the Right Amplifier

The amp is the heart of your setup. It’s not just about volume—it’s about tone, warmth, clarity, and versatility.
Types of Amplifiers
-
Instrument Amps (Practice/Combo Amps): These combos are compact and practical, delivering clean sound and occasional onboard effects. Great for practice and small gigs.
-
PA & Keyboard Amps: Useful when your rig needs bigger projection. Often flatter-toned but flexible and powerful.
-
Acoustic Guitar Amps: Since electric violins often benefit from a transparent tonal character, these can be a stellar match—especially models with dual channels and anti-feedback controls.
-
Bass Amps: Best reserved for electric cellos and basses, where low-end response is critical.
Key Amp Features
|
Feature |
Why It Matters for Electric Strings |
|
Clean Gain Headroom |
Maintains tone even at high volumes—critical for dynamic violin playing. |
|
EQ Control |
Sculpt your tone: brighten violins or warm cellos as needed. |
|
Anti-Feedback |
Stops squeal during live amplified performances. |
|
DI Output |
Essential for direct recording or integration with PA systems. |
|
Onboard Effects |
Convenient—but for more control, external pedals (next section) may be preferred. |
2. Effects Pedals: Creative Tone Shaping

Effects are where things get exciting. From subtle ambience to bold soundscapes, pedals allow you to craft your sonic signature.
Starter Pedals to Explore
- Reverb & Delay: Creates spatial depth and shimmer—especially flattering on bowed strings.
-
Chorus & Modulation: Thickens tone, adds movement, or mimics doubling—beautiful for layering violin lines.
-
Overdrive/Distortion: Use sparingly for grit or warmth—great in experimental or rock contexts.
-
Loopers: Build layered textures live—fantastic for solo performances or practice.
-
Volume/Phrase Control: Helpful for swells, dynamic shifts, and expressive playing.
Tips for Pedal Use
-
Signal Chain Matters: Generally, run from tuner → compression (if used) → drive → modulation → reverb/delay.
-
Buffer Your Signal: Since violin pickups and long cables can degrade tone, consider a good buffer pedal.
-
Power Cleanliness: Use isolated power supplies to avoid hum and noise—especially when using digital or analog-digital pedals.
3. Cables and Connectivity
Good equipment deserves good wiring. Ideal cables ensure you preserve tonal clarity and minimize noise.
-
High-Quality Instrument Cables: Low-capacitance, shielded cables maintain crisp highs and minimize signal loss.
-
Use Preamps as Needed: If your violin or viola’s piezo pickup is weak, a preamp can boost signal and add warmth.
-
Wireless Systems (Optional): Great for stage mobility—but require quality transmitters/receivers to avoid latency and interference.
Metzler’s electric instruments collection is a helpful starting point—explore amps, cables, and pickups to match your needs.
4. Recording Your Electric Violin

Capturing your performances or ideas cleanly is simpler than ever—with the right tools.
Methods for Capturing Sound
-
Mic + Amp: Great for capturing amp character and room ambience. Use a dynamic mic (like the Shure SM57) up close or a condenser for more detail.
-
DI + Amp Blend: Many amps include DI outputs. Record both the direct signal and mic’d sound to mix textures in post.
-
Audio Interface + Direct Input: Interfaces with Hi-Z inputs let you record clean DI sound for reamping or editing.
-
Amp Simulators: Tools like Guitar Rig or Helix mimic amp tones if microphones aren’t practical.
Recording Essentials
-
Ground Loop Mitigation: For studio setups, DI boxes and isolation can reduce hum.
-
Room Treatment: Even basic acoustic panels or positioning against solid surfaces improves captured tone significantly.
-
Backing Tracks/Headphones: Essential for overdubbing and practice tracking.
5. Putting It All Together: Sample Setups by Scenario
A. Bedroom Practice Setup
-
Instrument: Electric violin.
-
Amp: Compact acoustic or instrument amp with clean tone.
-
Pedals: Reverb into delay for expressive playing.
-
Recording: Interface with direct input for quick recording.
B. Live Solo Performance
-
Instrument: Electric viola or electric cello.
-
Amp + PA: Mic’ed amp and DI feed to PA for redundancy.
-
Pedals: Chorus for lushness, looper for layering.
-
Cables: High-quality shielded and a wireless system for freedom.
C. Studio Session
-
Instrument: Electric upright bass or electric violin.
-
Signal Path: Preamp → interface; amp + mic for tonal color blended later.
-
Effects: Minimal—let post-production handle ambience and depth.
-
Recording Chain: Ensure clean, low-noise input—add compression for consistency if needed.
6. Buying Tips for Amplification & Effects Gear
-
Define Your Needs First: Are you recording, performing live, or both? That helps narrow gear choices.
-
Start Clean, Then Add Color: Building your chain from a clean amp/pickup ensures flexibility later.
-
Test Before You Buy: In-store tryouts (when feasible) can quickly tell you if an amp responds well to violin dynamics.
-
Consider Scale & Weight: Pedals and amps can add bulk—prioritize portability if you're gigging frequently.
-
Future-Proof with Versatile Gear: DI outputs, effects loops, multiple channels—these options pay off as your rig evolves.
7. Why Choose Metzler’s Electric Instruments?
-
Wide Range of Instruments: From electric violins to electric violas, electric cellos, and electric upright basses, Metzler offers quality options for any string player.
-
Integrated Accessories: Easily explore complementary gear like amps, cables, pickups, recorders, and preamps—all within the electric instruments collection.
-
Reliable Reputation: Metzler is known for serving intermediate to professional level musicians with durable, craftsmanship-focused instruments and accessories.
Final Thoughts
Mastering amplification setup for electric violins isn’t just about gear—it’s about voice. Whether you’re gigging, recording, or exploring ambient soundscapes, your rig should enhance your expressiveness. Start with the right amps, explore creativity with effects, and capture your performance with stable recording setups. With Metzler’s comprehensive offerings in electric instruments, you’re one stop away from building a tailored, tone-rich setup that truly resonates.
Happy amplifying—and may your strings sing louder, richer, and more uniquely than ever.

